0%

【RayTracer】(二十)直接对光源采样

到目前为止我们实际上没有对之前的实现有什么实质性的更改,只是换了一种实现方式,所以得到的效果自然也是差不多的。但是改变实现方式是为了能够实现重要性采样,这一节我们将直接对光源进行采样。

1 对光源采样的 PDF

对光源直接采样就是把渲染方程中的对 $\omega$ 的积分改为对光源面积 $A$ 的积分,因此要做一个积分变量的替换,图形学中我们用立体角公式已经推导过 $d\omega$ 和 $dA$ 的关系:
$$
d\omega = \frac{dA·cos\theta’}{||x - p||^2}
$$
回顾我们之前改写的蒙特卡洛计算渲染方程:
$$
color_{out} = \frac{albedo·s(direction)·color_{in}}{p(direction)}
$$
我们只需要解出对光源采样的 $p(direction)$ 即可。因为无论对 $\omega$ 采样还是对光源 $A$ 采样,得到的方向的概率应该都是一样的,所以:
$$
p(direction)·d\omega = \frac{1}{A}·dA
$$
其中 $\frac{1}{A}$ 是对光源面积 $A$ 均匀采样的概率密度,把上面 $d\omega$ 和 $dA$ 的关系式带入即可得到:
$$
p(direction) = \frac{||x-p||^2}{cos\theta’·A}
$$
也就是对光源采样的概率密度函数。这实际上和我们图形学中推导的,通过积分变量替换改写渲染方程,再用对光源采样的 $pdf=\frac{1}{A}$ 进行蒙特卡洛积分计算是完全一样的,只是这里我们把整个积分替换的系数和对光源采样的 pdf 统一写成了对方向 $\omega$ 在光源方向上采样的 pdf。

2 实现

有了上面的公式我们可以改写 ray_color 函数:

1
2
3
4
5
6
7
8
9
10
11
12
13
14
15
16
17
18
19
20
21
22
23
24
25
26
27
28
29
30
31
32
33
34
35
36
37
38
39
40
41
42
43
44
45
46
47
// 得到光线颜色
color ray_color(ray& r, const color& background, const hittable& world, int depth, double RR) {
hit_record rec;

// 光线弹射指定次数后开始用RR算法终止递归
if (depth < 0 && random_double() >= RR) return color(0, 0, 0);

// 如果光线没有打到任何物体,返回背景颜色
// 这里的t的下界设为0.001是为了防止一些光线弹射到物体上得到的t非常接近0,比如可能出现0.000001这样的值
if (!world.hit(r, 0.001, infinity, rec))
return background;

// 根据物体材质得到光线传播方向、反射率及自发光颜色
ray scattered;
color albedo;
color emitted = rec.mat_ptr->emitted(rec.u, rec.v, rec.p);
// 采样光线的概率密度
double pdf;

// 对于光源,不会发生散射,返回光源颜色
if (!rec.mat_ptr->scatter(r, rec, albedo, scattered, pdf))
return emitted;

// 光源平面随机采样一点
auto on_light = point3(random_double(213, 343), 554, random_double(227, 332));
// 光源到着色点p的方向
auto to_light = on_light - rec.p;
// 得到距离用于之后计算pdf
auto distance_squared = to_light.length_squared();
// 方向归一化用于得到cos(theta')
to_light = normalize(to_light);
if (dot(to_light, rec.normal) < 0)
return emitted;
auto light_cosine = fabs(to_light.y());
if (light_cosine < 0.000001)
return emitted;
// 光源面积
double light_area = (343 - 213) * (332 - 227);
// 计算直接对光源采样的pdf
pdf = distance_squared / (light_cosine * light_area);
scattered = ray(rec.p, to_light, r.time());

// 渲染方程
return emitted
+ albedo * rec.mat_ptr->scattering_pdf(r, rec, scattered)
* ray_color(scattered, background, world, depth - 1, RR) / pdf / RR;
}

然后修改主函数:

1
2
3
4
5
6
7
8
9
10
11
12
...
case 6: // Cornell Box 场景
world = cornell_box();
aspect_ratio = 1.0;
image_width = 600;
samples_per_pixel = 10;
min_bounce = 45;
background = color(0, 0, 0);
lookfrom = point3(278, 278, -800);
lookat = point3(278, 278, 0);
vfov = 40.0;
...

每个像素只采样 10 根光线,得到的效果:

CornellBoxLight

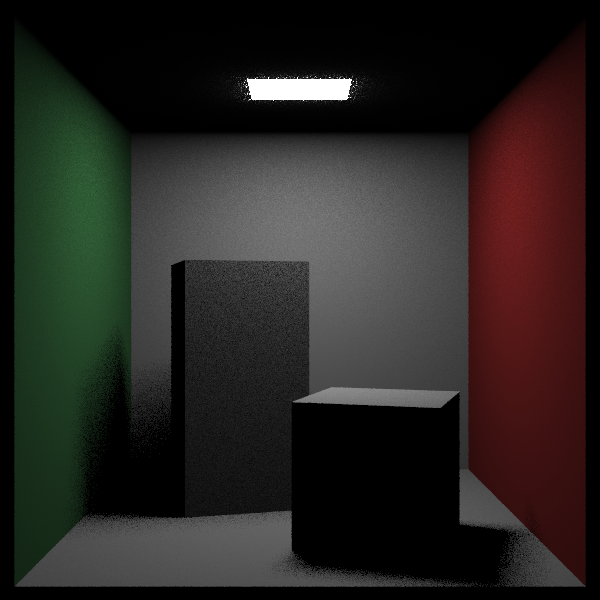
比之前每个像素采样 100 根光线的噪声还要小很多。

3 单向光源

可以看到上面的结果中,噪声主要集中在光源附近,这是因为光源是双面的,光源和天花板之间有一个很小的缝隙,为了解决这个问题我们可以让光源只向下发光,修改光源材质的 emitted 函数:

1
2
3
4
5
6
7
8
9
10
11
12
13
14
15
16
17
18
19
20
21
22
23
24
// 自发光材质,用作光源
class diffuse_light : public material {
public:
diffuse_light(shared_ptr<texture> a) : emit(a) {}
diffuse_light(color c) : emit(make_shared<solid_color>(c)) {}

virtual bool scatter(
ray& r_in, const hit_record& rec, color& attenuation, ray& scattered
) const override {
return false;
}

// 只有正面发光
virtual color emitted(
const ray& r_in, const hit_record& rec, double u, double v, const point3& p) const override {
if (rec.front_face)
return emit->value(u, v, p);
else
return color(0, 0, 0);
}

public:
shared_ptr<texture> emit;
};

然后实现一个翻转类,使得我们能够翻转光源法线,使它的法线全部指向 -y 方向:

1
2
3
4
5
6
7
8
9
10
11
12
13
14
15
16
17
18
19
20
21
22
// 翻转光源法线,使其只有正面发光
class flip_face : public hittable {
public:
flip_face(shared_ptr<hittable> p) : ptr(p) {}

virtual bool hit(
ray& r, double t_min, double t_max, hit_record& rec) const override {

if (!ptr->hit(r, t_min, t_max, rec))
return false;

rec.front_face = !rec.front_face;
return true;
}

virtual bool bounding_box(double time0, double time1, aabb& output_box) const override {
return ptr->bounding_box(time0, time1, output_box);
}

public:
shared_ptr<hittable> ptr;
};

然后在场景中调用翻转:

1
2
3
4
5
6
7
8
// Cornell Box场景
hittable_list cornell_box() {
...
objects.add(make_shared<flip_face>(make_shared<xz_rect>(213, 343, 227, 332, 554, light)));
...

return objects;
}

同时修改 ray_color 函数:

1
2
3
4
5
6
7
8
9
10
11
12
// 得到光线颜色
color ray_color(ray& r, const color& background, const hittable& world, int depth, double RR) {
hit_record rec;
...
color emitted = rec.mat_ptr->emitted(r, rec, rec.u, rec.v, rec.p);
...

// 渲染方程
return emitted
+ albedo * rec.mat_ptr->scattering_pdf(r, rec, scattered)
* ray_color(scattered, background, world, depth - 1, RR) / pdf / RR;
}

得到的效果:

CornellBoxLightFlip

---- 本文结束 知识又增加了亿点点!----

文章版权声明 1、博客名称:LycTechStack
2、博客网址:https://lz328.github.io/LycTechStack.github.io/
3、本博客的文章部分内容可能来源于网络,仅供大家学习与参考,如有侵权,请联系博主进行删除处理。
4、本博客所有文章版权归博主所有,如需转载请标明出处。