我们之前实现了物体和材质,但还缺少让物体变得更丰富的纹理,因此这一节我们实现一个纹理类。纹理可以是图片,也可以是程序生成的噪声,我们之前场景中所有的物体都是纯色的,实际上纯色也可以认为是一种纹理。因此我们可以定义一个纹理抽象类,然后在此基础上实现各种不同的纹理。
1 实现纯色纹理
纯色纹理的实现非常简单:
1 |
|
接下来要更新 hit_record ,存储交点的纹理坐标:
1 | struct hit_record { |
2 计算纹理坐标
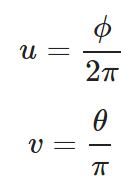
对于球体来说,计算纹理坐标其实就是把球面上每一个点映射到纹理平面 uv 上。最简单的表示一个球面上的点的方法是用方位角 $\phi$ 和俯仰角 $\theta$,由于 uv 平面的范围是 [0, 1],所以映射关系为:
给定方位角和俯仰角,可以计算球心在原点的单位球面上的一点:
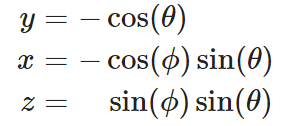
于是我们可以通过光线和球面的交点坐标解出方位角和俯仰角然后映射为纹理坐标。根据以上公式可以看出俯仰角 $\theta = arccos(-y)$,方位角 $\phi = arctan(-z / x)$,反三角函数计算可以直接使用 <cmath> 提供的函数 acos 和 atan2:
1 | theta = acos(-y) |
但是 atan2 返回的值的范围是 $[-\pi, \pi]$ ,并且是从 0 到 $\pi$,再从 $-\pi$ 到 0,这样映射的话,纹理坐标 u 就会是从 0 到 1/2,再从 -1/2 到 0,是不对的,但是可以利用:
1 | atan2(a, b) == atan2(-a, -b) + pi; |
这个公式返回的是从 0 到 $2\pi$ 的连续值,就可以映射为正确的纹理坐标了。因此可以通过:
1 | theta = acos(-y) |
得到正确的方位角和俯仰角,然后映射得到纹理坐标。在球体类中增加:
1 | class sphere : public hittable { |
同时更新球体的 hit 函数,将纹理坐标记录到 hit_record 中:
1 | bool sphere::hit(...) { |
3 为材质类添加纹理
现在我们可以为所有的材质增加纹理,代替之前的颜色:
1 | // lambertian材质类,在单位球面上采样得到散射方向 |
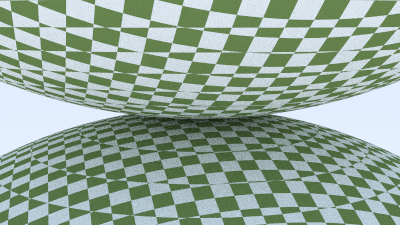
4 格子纹理
我们利用两种纹理交替形成一个格子纹理,这是一种经典的生成格子纹理的方法:
1 | // 格子纹理 |
5 测试效果
我们把随机场景中的地面的球体改为格子纹理:
1 | hittable_list random_scene() { |
得到的效果:
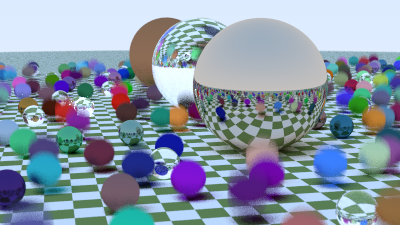
6 新的场景
接下来我们构建一个新的场景,由于之后我们可能还会有其他场景,为了便于管理,我们新建一个 sence.h 来存放各种场景:
1 |
|
然后修改主函数:
1 | ... |
效果如下: