0%

【RayTracer】(九)运动模糊

从这一节开始我们将进一步完善之前的光线追踪器,加入更多真正的光线追踪器中用到的算法和功能。首先我们将为场景中的物体加入运动,并且实现运动模糊效果。

1 运动模糊实现原理

在实际拍照的时候,运动模糊是由于在快门时间内,物体的位置发生了变化,使得一个像素融合了物体在不同位置的颜色,从而产生模糊的效果。快门时间是指从快门开启到快门关闭的这段时间。因此我们也可以加入快门时间这一概念,在投射光线的时候,随机在快门时间内投射一条光线,并且保证场景内的物体在该时间下在它应该在的位置即可。这样就可以让一个像素融合物体在多个位置的颜色,产生运动模糊效果。

2 实现

根据以上原理,我们首先要为每一条光线加上一个时间属性,说明这条光线是在什么时刻被投射出的,然后就可以根据这个时刻找到该时刻场景中物体的位置,再去计算交点等后续步骤。修改 ray.h 如下:

1
2
3
4
5
6
7
8
9
10
11
12
13
14
15
16
17
18
19
20
21
22
23
24
25
26
27
28
29
30
31
/*
光线类ray
*/
#pragma once
#ifndef RAY_H
#define RAY_H

#include "vec3.h"

class ray
{
public:
ray() {}
ray(const point3& origin, const vec3& direction, double time = 0.0) :
orig(origin), dir(direction), tm(time) {}

point3 origin() const { return orig; }
vec3 direction() const { return dir; }
double time() const { return tm; }

point3 at(double t) const {
return orig + t * dir;
}

public:
point3 orig;
vec3 dir;
double tm; // 光线被投射出的时刻
};

#endif

然后修改相机类,使它能够在给定快门时间内随机投射光线:

1
2
3
4
5
6
7
8
9
10
11
12
13
14
15
16
17
18
19
20
21
22
23
24
25
26
27
28
29
30
31
32
33
34
35
36
37
38
39
40
41
42
43
44
45
46
47
48
49
50
51
52
53
54
55
56
57
58
59
60
61
62
63
64
65
66
67
68
/*
相机类camera
*/
#pragma once

#ifndef CAMERA_H
#define CAMERA_H

#include "utilities.h"

class camera {
public:
camera(
point3 lookfrom,
point3 lookat,
vec3 vup,
double vfov,
double aspect_ratio,
double aperture, // 光圈大小,光圈为0就是之前的针孔相机
double focus_dist, // 焦点距离,在焦点距离处的物体不会发生散焦模糊
double _time0 = 0, // 快门开启时间
double _time1 = 0 // 快门关闭时间
) {
// 通过视场角和宽高比计算视口大小,视场角是垂直方向的,单位是角度
auto theta = degrees_to_radians(vfov);
auto h = tan(theta / 2);
auto viewport_height = 2.0 * h;
auto viewport_width = aspect_ratio * viewport_height;
// 计算视口平面的三个坐标轴
w = normalize(lookfrom - lookat);
u = normalize(cross(vup, w));
v = cross(w, u);
// 相机位置
origin = lookfrom;
// 视口
horizontal = focus_dist * viewport_width * u;
vertical = focus_dist * viewport_height * v;
lower_left_corner = origin - horizontal / 2 - vertical / 2 - focus_dist * w;
// 镜头半径等于光圈大小的一半
lens_radius = aperture / 2;
// 快门时间
time0 = _time0;
time1 = _time1;
}

ray get_ray(double s, double t) const {
// 圆盘内随机取一点作为偏移
vec3 rd = lens_radius * random_in_unit_disk();
vec3 offset = u * rd.x() + v * rd.y();
// 从偏离远镜头的位置投射光线,模拟散焦,并在快门时间内随机选择一个时刻作为该光线投射出的时刻
return ray(
origin + offset,
lower_left_corner + s * horizontal + t * vertical - origin - offset,
random_double(time0, time1)
);
}
private:
point3 origin;
point3 lower_left_corner;
vec3 horizontal;
vec3 vertical;
vec3 u, v, w;
double lens_radius;
double time0;
double time1;
};

#endif

然后还要记得修改材质类中构造散射光线的地方,散射光线的时刻和入射光线一致:

1
2
3
4
5
6
7
8
9
10
11
12
13
14
15
16
17
18
19
20
21
22
23
24
25
26
27
28
29
30
31
32
33
34
35
36
37
38
39
40
41
42
43
44
45
46
47
48
49
50
51
52
53
54
55
56
57
58
59
60
61
62
63
64
65
66
67
68
69
70
71
72
73
74
75
76
77
78
79
80
81
82
83
84
85
86
// lambertian材质类,在单位球面上采样得到散射方向
class lambertian : public material {
public:
lambertian(const color& a) : albedo(a) {}

virtual bool scatter(
ray& r_in, const hit_record& rec, color& attenuation, ray& scattered
) const override {
// 这里省略了rec.p + rec.normal + random_unit_vector() - rec.p中的rec.p;
auto scatter_direction = rec.normal + random_unit_vector();
// 如果散射方向为0,则取法线方向作为散射方向
if (scatter_direction.near_zero())
{
scatter_direction = rec.normal;
}
// 散射光线时刻和入射光线一样
scattered = ray(rec.p, scatter_direction, r_in.time());
attenuation = albedo;
return true;
}

public:
color albedo; //反射率
};

// 金属材质类
class metal : public material {
public:
metal(const color& a, const double f) : albedo(a), fuzz(f < 1 ? f : 1) {}

virtual bool scatter(
ray& r_in, const hit_record& rec, color& attenuation, ray& scattered
) const override {
// 传入镜面反射函数都是单位向量
vec3 reflected = reflect(normalize(r_in.direction()), rec.normal);
scattered = ray(rec.p, reflected + fuzz * random_in_unit_sphere(), r_in.time());
attenuation = albedo;
return (dot(scattered.direction(), rec.normal) > 0);
}

public:
color albedo; //反射率
double fuzz; //Glossy反射扰动系数
};

// 电介质材质类
class dielectric : public material {
public:
dielectric(double index_of_refraction) : ir(index_of_refraction) {}

virtual bool scatter(
ray& r_in, const hit_record& rec, color& attenuation, ray& scattered
) const override {
// 电介质不吸收任何光,全部被折射或者反射,所以衰减系数恒为1
attenuation = color(1.0, 1.0, 1.0);
// 如果是正面,则是从空气进入介质,反之从介质折射出去
double refraction_ratio = rec.front_face ? (1.0 / ir) : ir;
// 入射光线记得单位化,折射函数传入的参数都是单位向量
vec3 unit_direction = normalize(r_in.direction());
// 计算是否发生折射
double cos_theta = fmin(dot(-unit_direction, rec.normal), 1.0);
double sin_theta = sqrt(1.0 - cos_theta * cos_theta);

bool cannot_refract = refraction_ratio * sin_theta > 1.0;
vec3 direction;

if (cannot_refract || reflectance(cos_theta, refraction_ratio) > random_double())
direction = reflect(unit_direction, rec.normal);
else
direction = refract(unit_direction, rec.normal, refraction_ratio);

scattered = ray(rec.p, direction, r_in.time());
return true;
}

public:
double ir; //介质折射率

private:
static double reflectance(double cosine, double ref_idx) {
// 使用Schlick's近似计算菲涅尔项
auto r0 = (1 - ref_idx) / (1 + ref_idx);
r0 = r0 * r0;
return r0 + (1 - r0) * pow((1 - cosine), 5);
}
};

最后修改场景中的物体类,使其能够随时间移动,目前我们只有球体类:

1
2
3
4
5
6
7
8
9
10
11
12
13
14
15
16
17
18
19
20
21
22
23
24
25
26
27
28
29
30
31
32
33
34
35
36
37
38
39
40
41
42
43
44
45
46
47
48
49
50
51
52
53
54
55
56
57
58
59
60
61
62
63
64
65
66
67
/*
球体类sphere,派生于基类hittable
支持移动,time0时球心在center0,time1时球心在enter1,线性移动
不移动的球体可以将初始位置和结束位置设为相同
*/
#pragma once
#ifndef SPHERE_H
#define SPHERE_H

#include "hittable.h"

// 球体类以hittable抽象类为基类
class sphere : public hittable {
public:
sphere() {}
sphere(
point3 cen0, point3 cen1, double _time0, double _time1, double r, shared_ptr<material> m)
: center0(cen0), center1(cen1), time0(_time0), time1(_time1), radius(r), mat_ptr(m)
{};
virtual bool hit(ray& r, double t_min, double t_max, hit_record& rec) const override;
point3 center(double time) const;

public:
point3 center0, center1;
double time0, time1;
double radius;
shared_ptr<material> mat_ptr;
};

// 得到物体在某一时刻的球心位置
point3 sphere::center(double time) const {
if (time1 - time0 == 0) return center0;
return center0 + ((time - time0) / (time1 - time0)) * (center1 - center0);
}

bool sphere::hit(ray& r, double t_min, double t_max, hit_record& rec) const
{
vec3 oc = r.origin() - center(r.time());
auto a = r.direction().length_squared();
auto half_b = dot(oc, r.direction());
auto c = oc.length_squared() - radius * radius;

auto discriminant = half_b * half_b - a * c;
if (discriminant < 0) return false;
auto sqrtd = sqrt(discriminant);

// 找到满足条件的最近的交点
auto root = (-half_b - sqrtd) / a;
if (root < t_min || t_max < root) {
root = (-half_b + sqrtd) / a;
if (root < t_min || t_max < root)
return false;
}
// 记录该交点的相关信息
rec.t = root;
rec.p = r.at(rec.t);
// 法线记得归一化
vec3 outward_normal = (rec.p - center(r.time())) / radius;
// 判断交点在正面还是背面,并设置正确的法线方向
rec.set_face_normal(r, outward_normal);
// 记录材质
rec.mat_ptr = mat_ptr;

return true;
};

#endif

3 测试

修改主函数,还是用随机构建的场景,但是球体的初始化要用新的方法,同时为了渲染快一些,我们还是用之前的 16 : 9 的 400 * 225 的分辨率,每个像素采样 100 根光线:

1
2
3
4
5
6
7
8
9
10
11
12
13
14
15
16
17
18
19
20
21
22
23
24
25
26
27
28
29
30
31
32
33
34
35
36
37
38
39
40
41
42
43
44
45
46
47
48
49
50
51
52
53
54
55
56
57
58
59
60
61
62
63
64
65
66
67
68
69
70
71
72
73
74
75
76
77
78
79
80
81
82
83
84
85
86
87
88
89
90
91
92
93
94
95
96
97
98
99
100
101
102
103
104
105
106
107
108
109
110
111
112
113
114
115
116
117
118
119
120
121
122
123
124
125
#include <iostream>
#include <string>
#include <omp.h>
#define STB_IMAGE_WRITE_IMPLEMENTATION
#include "stb_image_write.h"
#include "hittable_list.h"
#include "sphere.h"
#include "color.h"
#include "camera.h"

// 随机构建场景
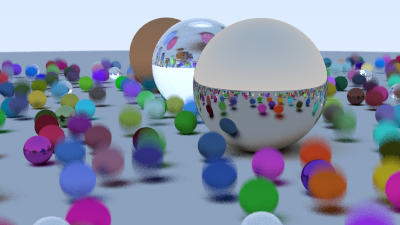
hittable_list random_scene() {
hittable_list world;

auto ground_material = make_shared<lambertian>(color(0.5, 0.5, 0.5));
world.add(make_shared<sphere>(
point3(0, -1000, 0), point3(0, -1000, 0), 0.0, 1.0, 1000, ground_material));

for (int a = -11; a < 11; a++) {
for (int b = -11; b < 11; b++) {
auto choose_mat = random_double();
point3 center(a + 0.9 * random_double(), 0.2, b + 0.9 * random_double());

if ((center - point3(4, 0.2, 0)).length() > 0.9) {
shared_ptr<material> sphere_material;

if (choose_mat < 0.8) {
// diffuse
auto albedo = random_vec() * random_vec();
sphere_material = make_shared<lambertian>(albedo);
// 移动的小球
auto center2 = center + vec3(0, random_double(0, 0.5), 0);
world.add(make_shared<sphere>(
center, center2, 0.0, 1.0, 0.2, sphere_material));
}
else if (choose_mat < 0.9) {
// metal
auto albedo = random_vec(0.5, 1);
auto fuzz = random_double(0, 0.5);
sphere_material = make_shared<metal>(albedo, fuzz);
world.add(make_shared<sphere>(
center, center, 0.0, 1.0, 0.2, sphere_material));
}
else {
// glass
sphere_material = make_shared<dielectric>(1.5);
world.add(make_shared<sphere>(
center, center, 0.0, 1.0, 0.2, sphere_material));
}
}
}
}

auto material1 = make_shared<dielectric>(1.5);
world.add(make_shared<sphere>(
point3(0, 1, 0), point3(0, 1, 0), 0.0, 1.0, 1.0, material1));

auto material2 = make_shared<lambertian>(color(0.4, 0.2, 0.1));
world.add(make_shared<sphere>(
point3(-4, 1, 0), point3(-4, 1, 0), 0.0, 1.0, 1.0, material2));

auto material3 = make_shared<metal>(color(0.7, 0.6, 0.5), 0.0);
world.add(make_shared<sphere>(
point3(4, 1, 0), point3(4, 1, 0), 0.0, 1.0, 1.0, material3));

return world;
}


int main()
{
/****图片保存,保存为png格式****/
std::string SavePath = "D:\\TechStack\\ComputerGraphics\\Ray Tracing in One Weekend Series\\Results\\The Next Week\\";
std::string filename = "MotionBlur.png";
std::string filepath = SavePath + filename;

/*******图片属性*******/
// 宽高比
const auto aspect_ratio = 16.0 / 9.0;
const int image_width = 400;
// 使用static_cast可以明确告诉编译器,这种损失精度的转换是在知情的情况下进行的
// 也可以让阅读程序的其他程序员明确你转换的目的而不是由于疏忽
const int image_height = static_cast<int>(image_width / aspect_ratio);
const int channel = 3;
// 每个像素的采样数量
const int samples_per_pixel = 100;
// 光线至少弹射次数
const int min_bounce = 45;
// 俄罗斯轮盘赌算法生存概率
const double RR = 0.9;

/*******创建相机*******/
point3 lookfrom(13, 2, 3);
point3 lookat(0, 0, 0);
vec3 vup(0, 1, 0);
auto dist_to_focus = 10.0;
auto aperture = 0.1;

camera cam(lookfrom, lookat, vup, 20, aspect_ratio, aperture, dist_to_focus, 0.0, 1.0);

/*******创建场景*******/
auto world = random_scene();

/******渲染部分*****/
// 3通道图像存在一维数组中
unsigned char* odata = (unsigned char*)malloc(image_width * image_height * channel);
unsigned char* p = odata;
for (int j = image_height - 1; j >= 0; --j) {
// 标准错误流显示进度信息,单行刷新显示
std::cerr << "\rScanlines remaining: " << j << ' ' << std::flush;
for (int i = 0; i < image_width; ++i) {
color pixel_color(0, 0, 0);
for (int s = 0; s < samples_per_pixel; ++s) {
// 在像素内部随机采样
auto u = (i + random_double()) / (image_width - 1);
auto v = (j + random_double()) / (image_height - 1);
ray r = cam.get_ray(u, v);
pixel_color += ray_color(r, world, min_bounce, RR);
}
write_color(p, pixel_color, samples_per_pixel);
}
}
stbi_write_png(filepath.c_str(), image_width, image_height, channel, odata, 0);
std::cerr << "\nDone.\n";
}

渲染效果如下:

MotionBlur

---- 本文结束 知识又增加了亿点点!----

文章版权声明 1、博客名称:LycTechStack
2、博客网址:https://lz328.github.io/LycTechStack.github.io/
3、本博客的文章部分内容可能来源于网络,仅供大家学习与参考,如有侵权,请联系博主进行删除处理。
4、本博客所有文章版权归博主所有,如需转载请标明出处。