这一节开始实现金属材质,为了使不同的物体能拥有不同的材质,我们需要先实现一个材质类。
1 材质抽象类 材质简单来说需要做两件事情:
描述光现在材质表面如何散射(或者说如何被吸收)
如果发生散射描述光线如何衰减
因此对于所有材质都要有一个产生散射光线的函数。所以我们可以先定义一个材质抽象类,然后让具体的材质去实现不同的产生散射光线的方法。
1 2 3 4 5 6 7 8 9 10 11 12 13 14 15 16 #pragma once #ifndef MATERIAL_H #define MATERIAL_H #include "utilities.h" struct hit_record ;class material {public : virtual bool scatter ( const ray& r_in, const hit_record& rec, color& attenuation, ray& scattered ) const 0 ;}; #endif
之后我们的渲染流程变为,投射光线到场景中计算和场景中所有物体最近的交点并记录下来,这个记录要有交点的位置、法线等信息,现在还要加上物体的材质信息,这样在之后才能利用该材质产生散射光线,然后计算颜色。因此我们先修改记录交点的结构体,并将该结构体移入 material.h 头文件中避免循环引用,在结构体声明之前加上 class material 告诉该结构体 material 这个类,不然会找不到:
1
2
3
4
5
6
7
8
9
10
11
12
13
14
class material ;struct hit_record { point3 p; vec3 normal; double t; bool front_face; shared_ptr<material> mat_ptr; inline void set_face_normal (ray& r, vec3& outward_normal) front_face = dot (r.direction (), outward_normal) < 0 ; normal = front_face ? outward_normal : -outward_normal; } };
然后修改物体类,为每个物体也加上材质,并在 hit 函数中把材质传递给上面的结构体:
1 2 3 4 5 6 7 8 9 10 11 12 13 14 15 16 17 18 19 20 21 22 23 24 25 26 27 28 29 30 31 32 33 34 35 36 37 38 39 40 41 42 43 44 45 46 47 48 49 50 51 52 53 54 #pragma once #ifndef SPHERE_H #define SPHERE_H #include "hittable.h" class sphere : public hittable {public : sphere () {} sphere (point3 cen, double r, shared_ptr<material> m) : center (cen), radius (r), mat_ptr (m) {}; virtual bool hit (ray& r, double t_min, double t_max, hit_record& rec) const override public : point3 center; double radius; shared_ptr<material> mat_ptr; }; bool sphere::hit (ray& r, double t_min, double t_max, hit_record& rec) const vec3 oc = r.origin () - center; auto a = r.direction ().length_squared (); auto half_b = dot (oc, r.direction ()); auto c = oc.length_squared () - radius * radius; auto discriminant = half_b * half_b - a * c; if (discriminant < 0 ) return false ; auto sqrtd = sqrt (discriminant); auto root = (-half_b - sqrtd) / a; if (root < t_min || t_max < root) { root = (-half_b + sqrtd) / a; if (root < t_min || t_max < root) return false ; } rec.t = root; rec.p = r.at (rec.t); vec3 outward_normal = (rec.p - center) / radius; rec.set_face_normal (r, outward_normal); rec.mat_ptr = mat_ptr; return true ; }; #endif
2 实现漫反射材质 现在可以实现各种材质派生类了,先把上一节中的漫反射材质封装在类中,首先是 Lambertian 材质,可以理解为它以发生散射并以反射率 R 衰减,也可以理解为发生散射但不衰减,只是吸收了 1-R 的光线,上一节中我们把反射率直接固定了 rgb 都等于 0.5 ,但在材质类中反射率应该可以自定义。我们直接把上一节中的实现拿来组织成一个类:
1 2 3 4 5 6 7 8 9 10 11 12 13 14 15 16 17 18 class lambertian : public material {public : lambertian (const color& a) : albedo (a) {} virtual bool scatter ( const ray& r_in, const hit_record& rec, color& attenuation, ray& scattered ) const override auto scatter_direction = rec.normal + random_unit_vector (); scattered = ray (rec.p, scatter_direction); attenuation = albedo; return true ; } public : color albedo; };
在上面的实现中还有一个问题,如果随机生成的方向和法线方向刚好相反,这两个向量的和将为 0 ,这将会导致散射方向为 0 ,进而使渲染出来的场景出现问题。因此我们需要阻止这种情况发生,我们在 vec3 类中增加一个判断向量是否接近 0 的方法:
1
2
3
4
5
6
7
8
9
class vec3 { ... bool near_zero () const const auto s = 1e-8 ; return (fabs (e[0 ]) < s) && (fabs (e[1 ]) < s) && (fabs (e[2 ]) < s); } ... };
然后在材质类中的散射函数中增加判断:
1 2 3 4 5 6 7 8 9 10 11 12 13 14 15 16 17 18 19 20 21 22 23 class lambertian : public material {public : lambertian (const color& a) : albedo (a) {} virtual bool scatter ( const ray& r_in, const hit_record& rec, color& attenuation, ray& scattered ) const override auto scatter_direction = rec.normal + random_unit_vector (); if (scatter_direction.near_zero ()) { scatter_direction = rec.normal; } scattered = ray (rec.p, scatter_direction); attenuation = albedo; return true ; } public : color albedo; };
然后顺便实现另外两种散射方法的漫反射材质,在半球采样不需要考虑散射方向为 0 的情况:
1 2 3 4 5 6 7 8 9 10 11 12 13 14 15 16 17 18 19 20 21 22 23 24 25 26 27 28 29 30 31 32 33 34 35 36 37 38 39 class lambertian_insphere : public material {public : lambertian_insphere (const color& a) : albedo (a) {} virtual bool scatter ( const ray& r_in, const hit_record& rec, color& attenuation, ray& scattered ) const override auto scatter_direction = rec.normal + random_in_unit_sphere (); if (scatter_direction.near_zero ()) { scatter_direction = rec.normal; } scattered = ray (rec.p, scatter_direction); attenuation = albedo; return true ; } public : color albedo; }; class lambertian_hemisphere : public material {public : lambertian_hemisphere (const color& a) : albedo (a) {} virtual bool scatter ( const ray& r_in, const hit_record& rec, color& attenuation, ray& scattered ) const override auto scatter_direction = random_in_hemisphere (rec.normal); scattered = ray (rec.p, scatter_direction); attenuation = albedo; return true ; } public : color albedo; };
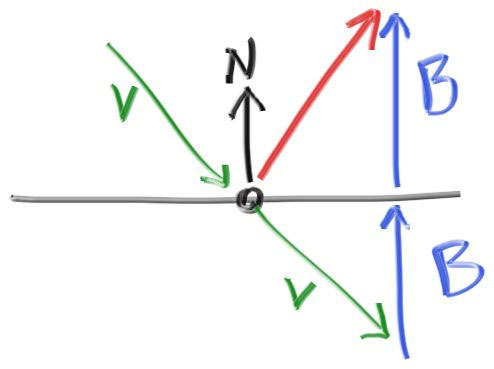
3 实现金属材质 3.1 镜面反射 金属材质因为足够光滑,因此光线会在表面发生完美的镜面反射,因此金属材质的散射方向就是入射光线的镜面反射方向,首先我门要考虑如何求镜面反射方向,这在图形学中已经学过,但在我们的实现稍微有些不同,我们的代码中入射光线(从像素投射的光线)是指向表面的(之前都是从表面向外指的):
入射光线方向为 $\vec v$ ,法线为 $\vec n$,则反射方向为 $\vec v + 2\vec b$,$\vec b$ 和法线同方向,长度为 $\vec v$ 在法线方向的投影,因此镜面反射光线为:
1 2 3 4 inline vec3 reflect (const vec3& v, const vec3& n) return v + 2 * dot (-v, n) * n; }
我们假设传入该函数的都是单位向量,所以 $\vec v$ 在法线方向的投影就可以表示成点乘。
然后就可以定义金属材质类了:
1 2 3 4 5 6 7 8 9 10 11 12 13 14 15 16 17 18 class metal : public material {public : metal (const color& a) : albedo (a) {} virtual bool scatter ( ray& r_in, const hit_record& rec, color& attenuation, ray& scattered ) const override vec3 reflected = reflect (normalize (r_in.direction ()), rec.normal); scattered = ray (rec.p, reflected); attenuation = albedo; return (dot (scattered.direction (), rec.normal) > 0 ); } public : color albedo; };
然后修改 ray_color 函数,让它使用材质类计算颜色:
1 2 3 4 5 6 7 8 9 10 11 12 13 14 15 16 17 18 19 20 color ray_color (ray& r, const hittable& world) { hit_record rec; auto RR = 0.8 ; if (world.hit (r, 0.001 , infinity, rec)) { if (random_double () >= RR) return color (0 , 0 , 0 ); ray scattered; color attenuation; if (rec.mat_ptr->scatter (r, rec, attenuation, scattered)) return attenuation * ray_color (scattered, world) / RR; return color (0 , 0 , 0 ); } vec3 unit_direction = normalize (r.direction ()); auto t = 0.5 * (unit_direction.y () + 1.0 ); return (1.0 - t) * color (1.0 , 1.0 , 1.0 ) + t * color (0.5 , 0.7 , 1.0 ); }
修改主函数,向场景中加入各种材质的物体:
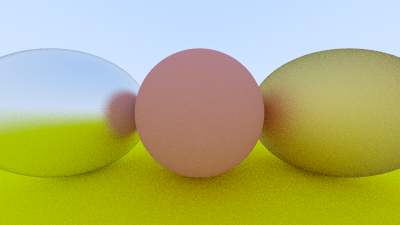
1 2 3 4 5 6 7 8 9 10 11 12 13 14 15 16 17 18 19 20 21 22 23 24 25 26 27 28 29 30 31 32 33 34 35 36 37 38 39 40 41 42 43 44 45 46 47 48 49 50 51 52 53 54 55 56 57 58 59 60 61 62 63 #include <iostream> #include <string> #define STB_IMAGE_WRITE_IMPLEMENTATION #include "stb_image_write.h" #include "hittable_list.h" #include "sphere.h" #include "color.h" #include "camera.h" int main () std::string SavePath = "D:\\TechStack\\ComputerGraphics\\Ray Tracing in One Weekend Series\\Results\\" ; std::string filename = "Metal.png" ; std::string filepath = SavePath + filename; const auto aspect_ratio = 16.0 / 9.0 ; const int image_width = 400 ; const int image_height = static_cast <int >(image_width / aspect_ratio); const int channel = 3 ; const int samples_per_pixel = 100 ; camera cam; hittable_list world; auto material_ground = make_shared <lambertian>(color (0.8 , 0.8 , 0.0 )); auto material_center = make_shared <lambertian>(color (0.7 , 0.3 , 0.3 )); auto material_left = make_shared <metal>(color (0.8 , 0.8 , 0.8 )); auto material_right = make_shared <metal>(color (0.8 , 0.6 , 0.2 )); world.add (make_shared <sphere>(point3 (0.0 , -100.5 , -1.0 ), 100.0 , material_ground)); world.add (make_shared <sphere>(point3 (0.0 , 0.0 , -1.0 ), 0.5 , material_center)); world.add (make_shared <sphere>(point3 (-1.0 , 0.0 , -1.0 ), 0.5 , material_left)); world.add (make_shared <sphere>(point3 (1.0 , 0.0 , -1.0 ), 0.5 , material_right)); unsigned char * odata = (unsigned char *)malloc (image_width * image_height * channel); unsigned char * p = odata; for (int j = image_height - 1 ; j >= 0 ; --j) { std::cerr << "\rScanlines remaining: " << j << ' ' << std::flush; for (int i = 0 ; i < image_width; ++i) { color pixel_color (0 , 0 , 0 ) ; for (int s = 0 ; s < samples_per_pixel; ++s) { auto u = (i + random_double ()) / (image_width - 1 ); auto v = (j + random_double ()) / (image_height - 1 ); ray r = cam.get_ray (u, v); pixel_color += ray_color (r, world); } write_color (p, pixel_color, samples_per_pixel); } } stbi_write_png (filepath.c_str (), image_width, image_height, channel, odata, 0 ); std::cerr << "\nDone.\n" ; }
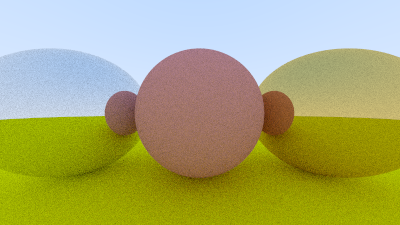
渲染结果如下:
随着场景变得复杂,我们现在的算法又暴露出一个小问题,噪声过大,这是因为使用了俄罗斯轮盘赌算法,我们现在的生存概率是 0.8,也就说当光线第一次打到物体上的时候就会有 0.2 概率返回 0 颜色,所以会产生很多噪点。因此我们可以先让光线至少弹射几次,之后再应用俄罗斯轮盘赌算法终止递归。为了方便之后修改,可以将生存概率和最少弹射次数作为可修改参数:
1 2 3 4 5 6 7 8 9 10 11 12 13 14 15 16 17 18 color ray_color (ray& r, const hittable& world, int depth, double RR) { hit_record rec; if (world.hit (r, 0.001 , infinity, rec)) { if (depth < 0 && random_double () >= RR) return color (0 , 0 , 0 ); ray scattered; color attenuation; if (rec.mat_ptr->scatter (r, rec, attenuation, scattered)) return attenuation * ray_color (scattered, world, depth - 1 , RR) / RR; return color (0 , 0 , 0 ); } vec3 unit_direction = normalize (r.direction ()); auto t = 0.5 * (unit_direction.y () + 1.0 ); return (1.0 - t) * color (1.0 , 1.0 , 1.0 ) + t * color (0.5 , 0.7 , 1.0 ); }
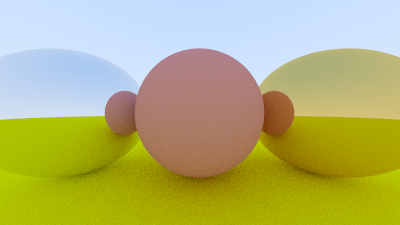
在主函数中设定最少弹射次数为 3 次,生存概率为 0.9,渲染效果如下:
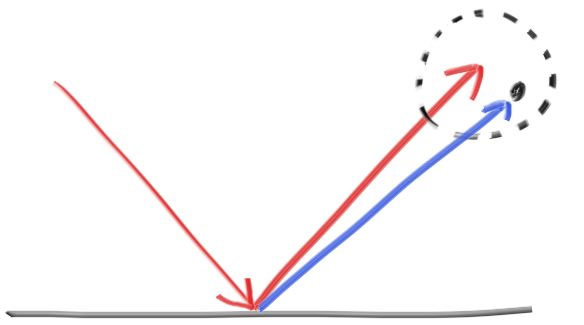
3.2 Glossy 反射 可以看到金属球上的倒影是完美的镜面反射,接下来我们可以向金属材质中添加 Glossy 反射,在镜面反射方向找一个小的球体对镜面反射方向进行扰动,使得光线朝着镜面反射方向周围一定范围散射:
我们可以在材质类中定义一个扰动球半径,扰动球半径越大,模糊越严重,扰动球半径为 0 就是完美的镜面反射,同时扰动球半径不能大于 1 ,否则光线可能被扰动到物体内部,所以如果给定的扰动球半径大于 1 ,我们要截断到 1。
1 2 3 4 5 6 7 8 9 10 11 12 13 14 15 16 17 18 19 class metal : public material {public : metal (const color& a, const double f) : albedo (a), fuzz (f < 1 ? f : 1 ) {} virtual bool scatter ( ray& r_in, const hit_record& rec, color& attenuation, ray& scattered ) const override vec3 reflected = reflect (normalize (r_in.direction ()), rec.normal); scattered = ray (rec.p, reflected + fuzz * random_in_unit_sphere ()); attenuation = albedo; return (dot (scattered.direction (), rec.normal) > 0 ); } public : color albedo; double fuzz; };
我们在创建材质的时候可以赋予不同的扰动系数,是的物体产生不同的表现,修改主函数创建两种不同扰动系数的金属材质:
1 2 3 4 5 6 7 8 9 10 11 12 13 14 15 16 17 18 19 20 21 22 23 24 25 26 27 28 29 30 31 32 33 34 35 36 37 38 39 40 41 42 43 44 45 46 47 48 49 50 51 52 53 54 55 56 57 58 59 60 61 62 63 64 65 66 67 #include <iostream> #include <string> #define STB_IMAGE_WRITE_IMPLEMENTATION #include "stb_image_write.h" #include "hittable_list.h" #include "sphere.h" #include "color.h" #include "camera.h" int main () std::string SavePath = "D:\\TechStack\\ComputerGraphics\\Ray Tracing in One Weekend Series\\Results\\" ; std::string filename = "MetalDenoise.png" ; std::string filepath = SavePath + filename; const auto aspect_ratio = 16.0 / 9.0 ; const int image_width = 400 ; const int image_height = static_cast <int >(image_width / aspect_ratio); const int channel = 3 ; const int samples_per_pixel = 100 ; const int min_bounce = 3 ; const double RR = 0.9 ; camera cam; hittable_list world; auto material_ground = make_shared <lambertian>(color (0.8 , 0.8 , 0.0 )); auto material_center = make_shared <lambertian>(color (0.7 , 0.3 , 0.3 )); auto material_left = make_shared <metal>(color (0.8 , 0.8 , 0.8 ), 0.3 ); auto material_right = make_shared <metal>(color (0.8 , 0.6 , 0.2 ), 1.0 ); world.add (make_shared <sphere>(point3 (0.0 , -100.5 , -1.0 ), 100.0 , material_ground)); world.add (make_shared <sphere>(point3 (0.0 , 0.0 , -1.0 ), 0.5 , material_center)); world.add (make_shared <sphere>(point3 (-1.0 , 0.0 , -1.0 ), 0.5 , material_left)); world.add (make_shared <sphere>(point3 (1.0 , 0.0 , -1.0 ), 0.5 , material_right)); unsigned char * odata = (unsigned char *)malloc (image_width * image_height * channel); unsigned char * p = odata; for (int j = image_height - 1 ; j >= 0 ; --j) { std::cerr << "\rScanlines remaining: " << j << ' ' << std::flush; for (int i = 0 ; i < image_width; ++i) { color pixel_color (0 , 0 , 0 ) ; for (int s = 0 ; s < samples_per_pixel; ++s) { auto u = (i + random_double ()) / (image_width - 1 ); auto v = (j + random_double ()) / (image_height - 1 ); ray r = cam.get_ray (u, v); pixel_color += ray_color (r, world, min_bounce, RR); } write_color (p, pixel_color, samples_per_pixel); } } stbi_write_png (filepath.c_str (), image_width, image_height, channel, odata, 0 ); std::cerr << "\nDone.\n" ; }
渲染结果如下: